[Episode 6] The Ghost House

After ridding the Gloom Alley streets of the various trouble-causing gangs and receiving the Key to the Ghost House as a reward from the owner of Bar Kuroi, Acarno finds himself in the garden to the Ghost House ready to see what's on the inside.

[Episode 6] The Ghost House

Summary

After ridding the Gloom Alley streets of the various trouble-causing gangs and receiving the Key to the Ghost House as a reward from the owner of Bar Kuroi, Acarno finds himself in the garden to the Ghost House ready to see what’s on the inside.

Although this section can be  skipped by using a simple shortcut to bypass the Ghost House in the interest of speed-running, playing the game properly means you will have to enter and subsequently beat the Ghost House before exiting through the back door in order to continue.

Video

Shortcut; It is worth noting that by heading to the left of the Ghost House and hopping over the fence, you can access the back garden via the roof. Click here to visit the last past of this walkthrough if you want to see how. Skipping the Ghost House will save time, but miss a whole bunch of items.

In the garden, facing the Ghost House, locate the coffin to Acarno’s left and examine it which will cause the lid to open.

Item; Pickup the MAGNUM SHELL inside the coffin.
Ghost House; Head over to the front door of the Ghost House and use the KEY FOR GHOST HOUSE to gain access.

There is a trap immediately inside the door – if you step forward then you’ll be crushed by a falling chandelier – take a single step forward and then step straight back again. This should cause the chandelier to fall without crushing you, allowing you to collect several items in this area safely;

Chandelier; If you know it's there, the chandelier is easily avoided.

You may be interested to know that this trap pays tribute to Doctor Hauzer, a game by OverBlood 2 creators, Riverhillsoft. Doctor Hauzer also features death by a falling chandelier. It is also recognised as the first truly 3D survival horror game (released in 1994 for the 3DO).
Item; Pick up the 2 MAGNUM SHELLS on the fallen chandelier.
Switch; Facing the main doors of the Ghost House, you'll notice a control panel. Interact with it to turn on the lights.
Item; Head up the central staircase and take the set on the left as they branch off. Proceed all the way to the end of the balcony and pickup the FIRE EXTINGUISHER CARTRIDGE.
Ledge; Turn around and approach the guard railing and spot the window ledge above the main doors (you should be able to see some items twinkling). Jump across to the ledge.
Items; On the window ledge pick up 5 MAGAZINE CARTRIDGES and 2 BURST BOMBS.
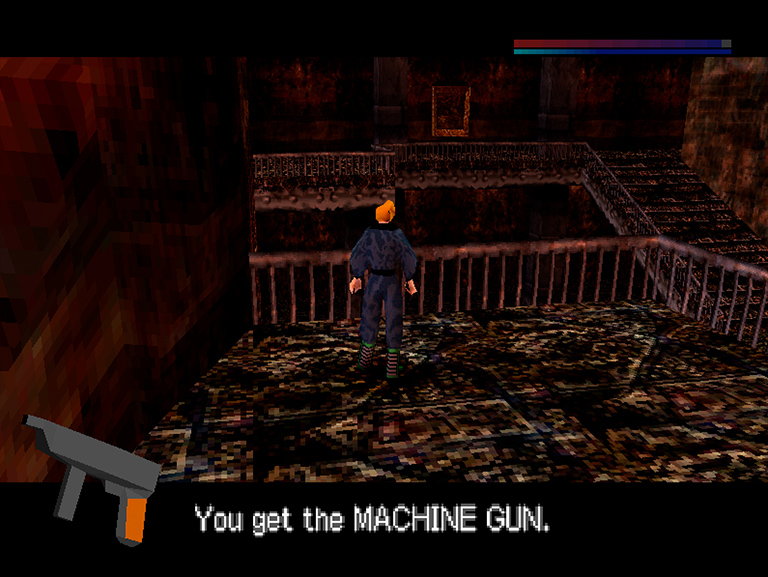
Item; From the window ledge, jump across to the landing which is on the opposite side of the room to where you previously picked up the FIRE EXTINGUISHER CARTRIDGE and pick up the MACHINE GUN on the floor.
Aim; Turn to face the window ledge you just jumped from and use the HOOK SHOT to access a second window ledge above.
Item; Pick up the 2 MACHINE GUN CARTRIDGES on the higher window ledge. Equip the SHOCK ABSORBER BOOTS and drop back down to ground level.
Door; Head back up the stairs and left as they branch off. Turn right at the top of the stairs and head over to the first (silver) door on your right.

Stay vigilant in the next room as falling off the narrow walkway is easily done. Continue heading up the inclining walkway and you will end up on a platform with a switch situated within an alcove.

Switch; Pressing the switch will activate the elevator on the opposite side of the room.
Item; Underneath the walkway on which you're stood there is a silver, metal mesh box. Drop down in order to pick up the FIRE EXTINGUISHER CARTRIDGE.
Item; Jump off of the mesh box into the middle of the room and you will land into a large pool of water. Swim to the bottom and collect the two separate DIAMONDS.
Aim; Use the HOOK SHOT on the waters surface. Note that it's possible to aim at two separate targets - aim for the higher one of the two as pictured.
Elevator; Once you're on the walkway, head down the stairs and onto the turquoise elevator. Interact with the control panel and the elevator will ascend.
Second switch; Once the elevator stops, walk onto the platform and hit the switch situated in the alcove.
Exit; Hop back onto the elevator and hit the control panel once again. Once fully descended, head up the stairs and head through the door at the top.
Item; Back on the landing head left and around the corner and pick up the 3 ENERGY PACKS on the floor.
Painting; Continue heading down the corridor until you come back to the main hallway - head down the stairs and interact with the painting on the wall (which is now illuminated).

On the other side of the painting, drop through the hole on the floor in front of you (ensuring you have the SOCK ABSORBER BOOTS equipped). When you hit the ground below, set a TIME BOMB down at one end of the blue doors next to you and move out of the blast radius in order to reveal a treasure chest. Interact with the chest and it will open, allowing you to grab the item inside.

Item; Pickup the KEY FOR BACKDOOR from inside the chest.

Climb all the way up the ladders in front of the chest and back through the door, emerging once again on the steps in the main entrance of the Ghost House. There are two final items to collect before leaving;

Item; Locate the two flaming torches on the wall on both sides of the illuminated painting you just went through - equip the FIRE EXTINGUISHER and put out the flames, allowing you to jump onto each extinguished torch in order to pick up a two separate GEO STONE.
Back door; On the ground floor, head around the back of the stair case. Use the KEY FOR BACKDOOR on the control panel in the middle of the back door to make it open.

In the back garden of the Ghost House jump onto the large gate in front of you, pull yourself up and drop off the other side. Equip the RED LEATHER. Opposite you is a chain-linked fence – head towards it and jump over the wall attached to it’s left-hand side.

Junk yard; Once in the junk yard, head between the wooden crate and black boxes on the ground.

Cut scene

Time to race; You must beat Cracker, which is not too hard.
Instructions; How to control the junk blade.

The race involves a couple of laps of a simple track, lasting around two minutes. Unlike in some of the other vehicle-related segments of the game, you will not sustain any damage for hitting the walls as you progress around the track, so simply hold the acceleration button until you eventually win the race.
Episode 6; Complete.